Share Wi-Fi from your hotel or college dorm: Connect your XBOX, PS4, Roku, or other devices to college/university or hotel Wi-Fi
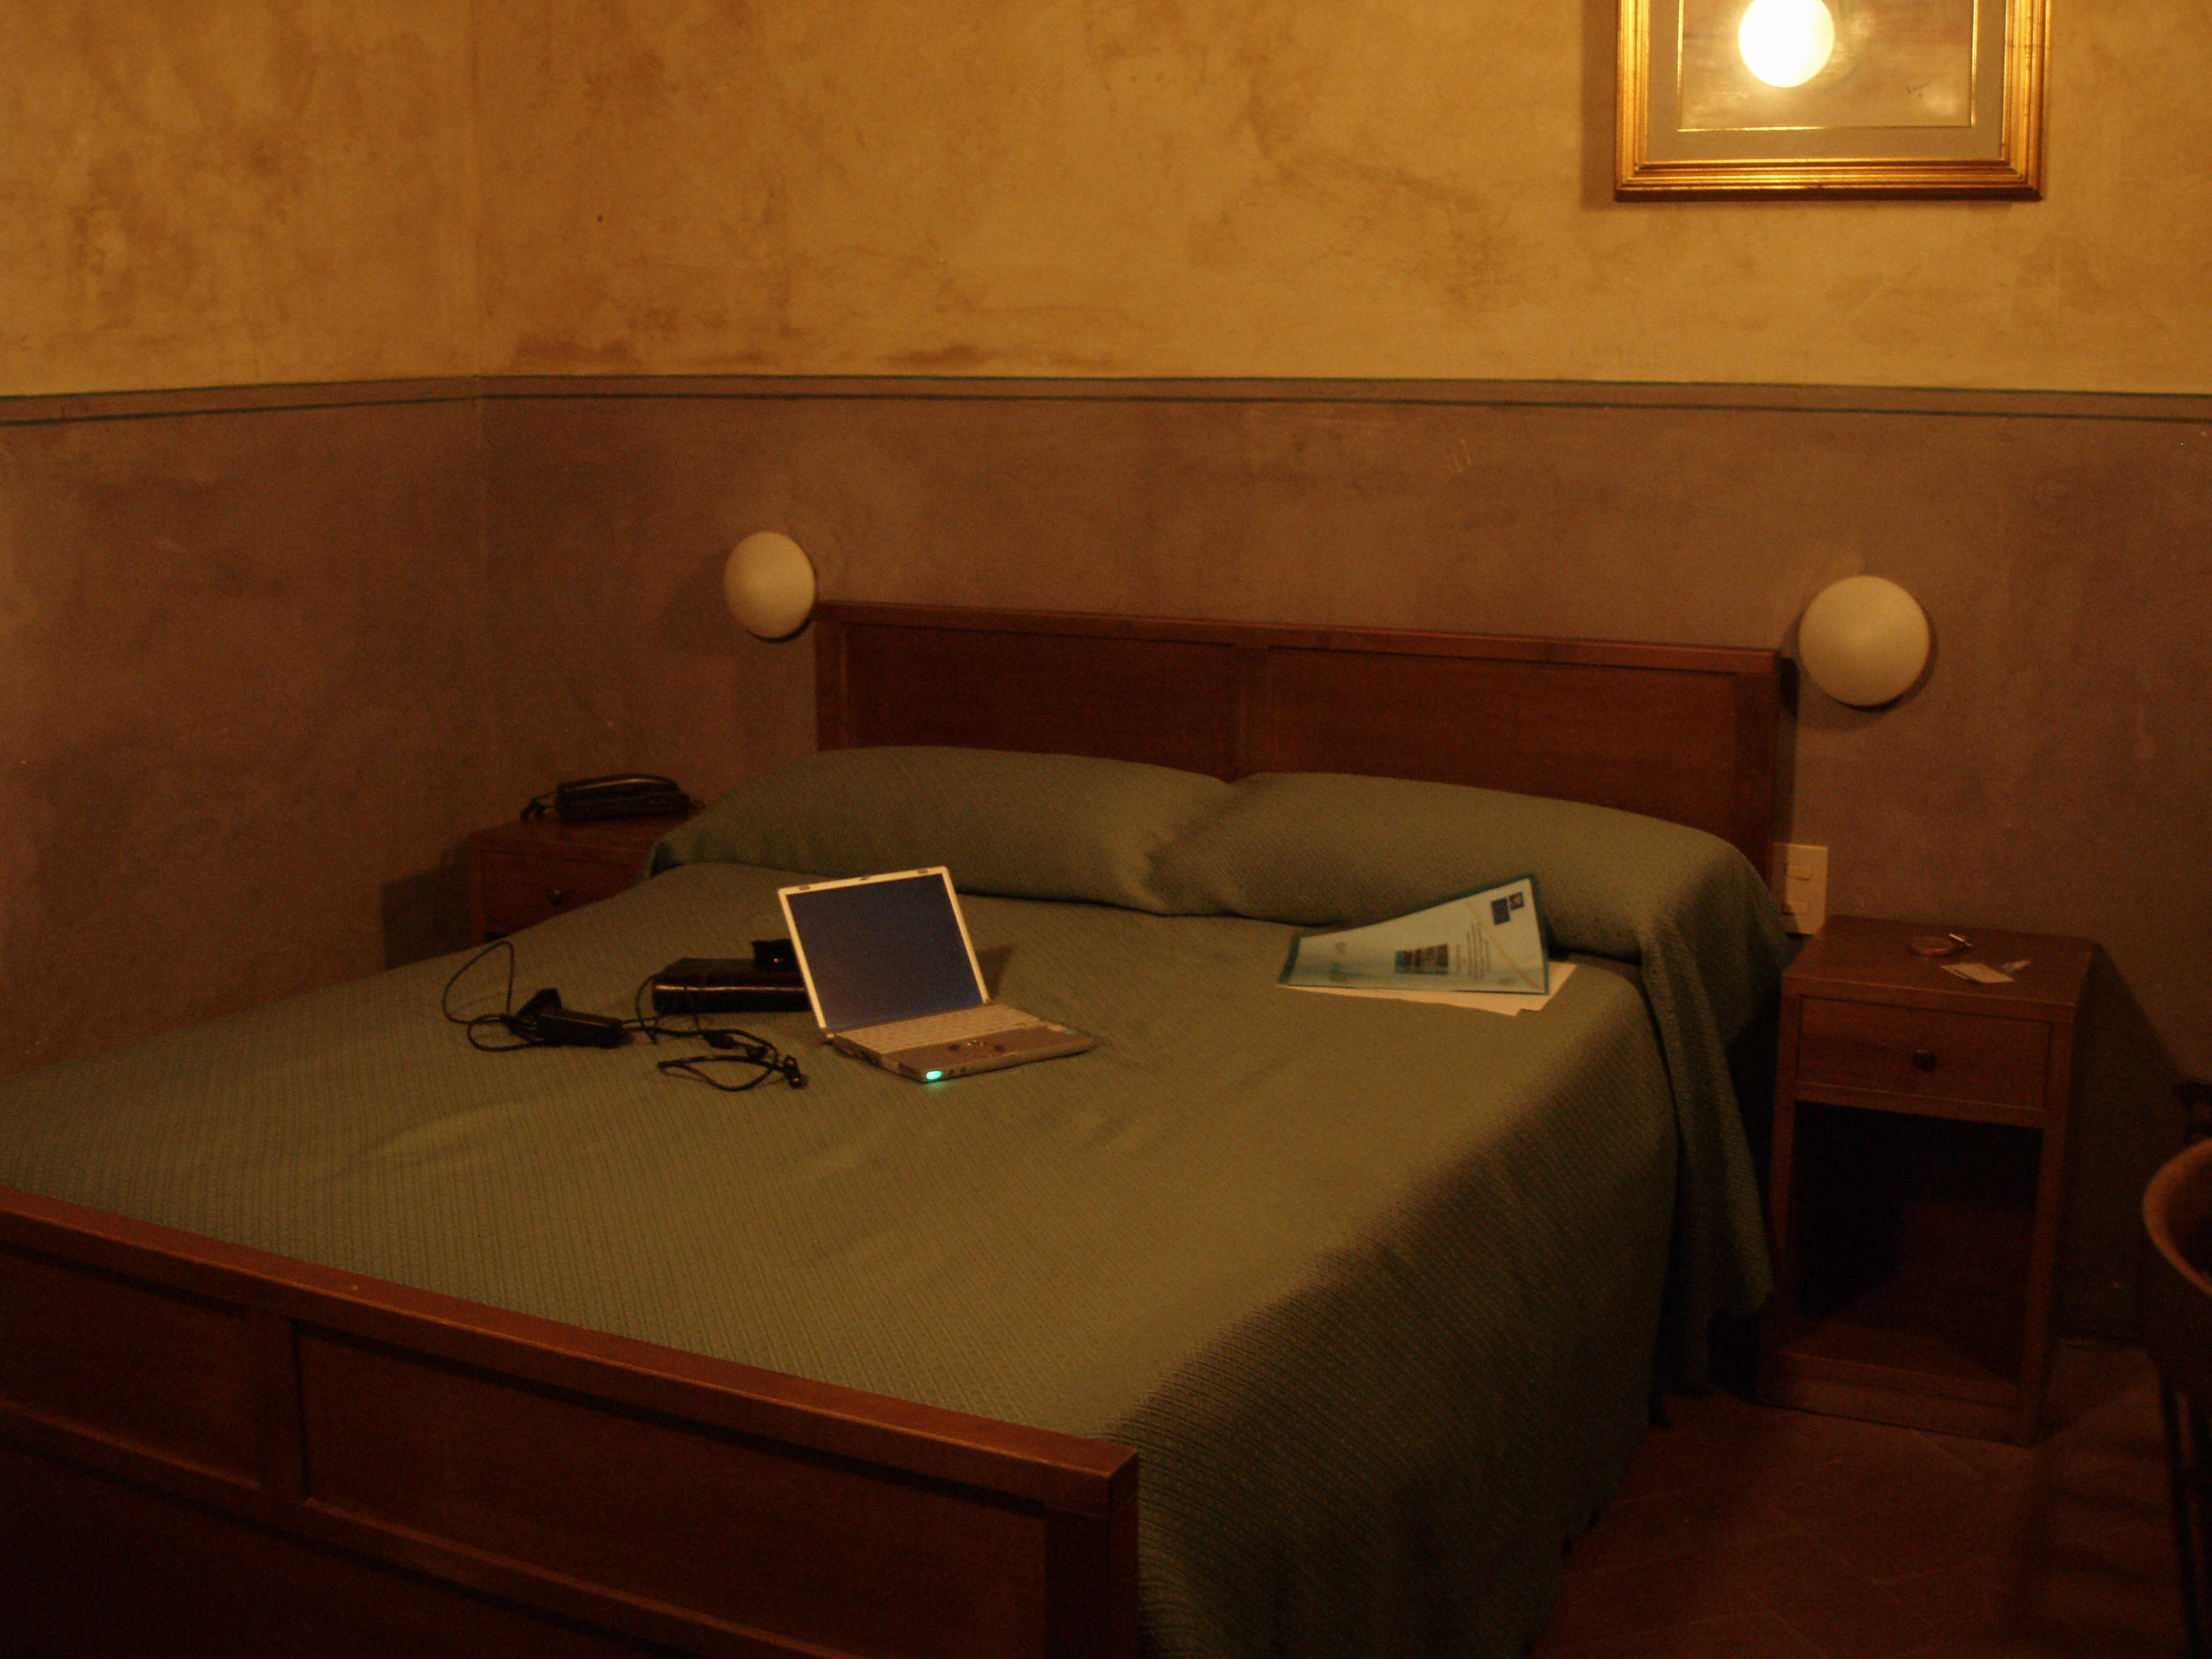
Did you bring your Roku or Chromecast on your trip, only to find out you could not get it to connect to your hotel’s internet? Were you really excited to play some multi-player on your new XBOX or PS4 at college, but you can’t get it to recognize your dorm’s wi-fi?
You may be able to create a wi-fi hotspot of your own to share that internet with your devices.
First, there are some requirements:
- You will need a PC running Windows, 7 or 8(.1) are preferred.
- Your PC’s wireless card will need to support internet sharing (more on that later).
- You are able to have the PC powered on for as long as you need the internet connection. In other words, if you close your laptop, you’ll lose connection until it’s opened back up.
If you think you might meet those requirements, let’s move on. Here you’ll learn to create a wi-fi hotspot from your PC with a network name and password of your choosing that your devices will be able to recognize and connect to. You can share wi-fi from a hotel, college dorm, business, or anywhere else that your computer can connect to the internet.
The first step is to show you how to figure out whether your PC’s wireless card supports sharing your wi-fi connection. Also, this doesn’t have to be in a hotel, college dorm room, or similar setting. This is just typically the settings where this kind of setup is needed/wanted. You also may want to do it for some other reason than to connect devices like those outlined.
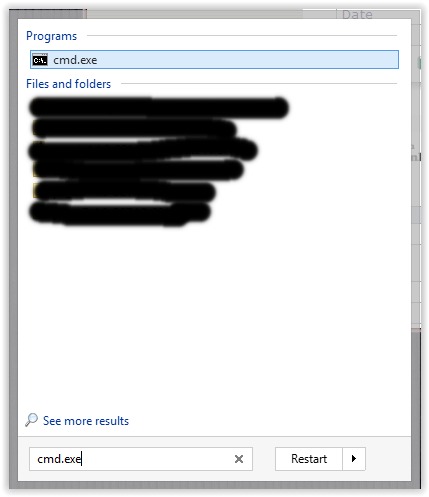
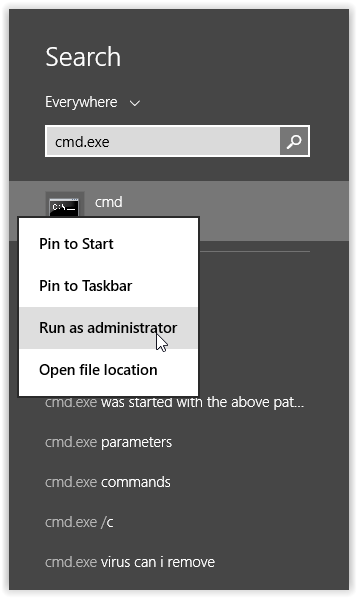
To proceed in checking your computer’s capability, you need to open up a command prompt. This is a way of manually entering commands that is pretty much only done by us nerds nowadays, but was once the main way we interacted with our computers. The simplest way to open up a command prompt is by searching in your start menu, something I’ve demonstrated with Windows 7 and 8 set-ups. Once you see the “cmd.exe” you’re looking for, right-click and click on “run as administrator.” If you don’t have administrator access, you’re going to need it.
Windows 7:
Windows 8:
Now you should have a black window with a few lines of plain text there. Very simple, yet very scary. Don’t worry, we have your back. Just type the following, and hit enter:
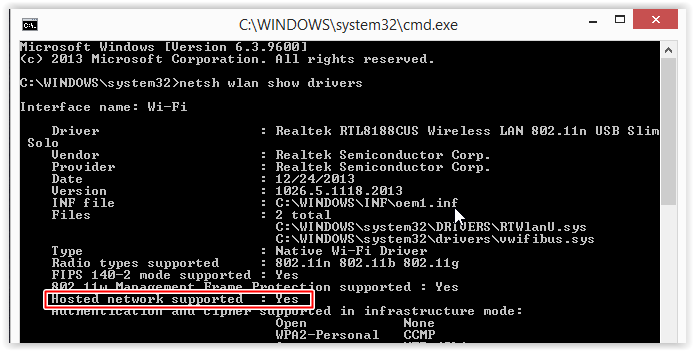
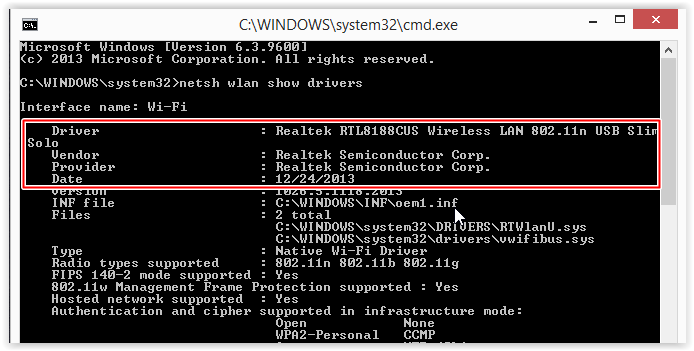
netsh wlan show drivers
The information we are looking for is “hosted network supported” and we want the answer to be yes. If it is no, you can try to update the driver through the manufacturer – the name of the wireless card is the first line you see. In this example, it is “Realtek RTL8188CUS …” so you could probably google that term plus “driver” and there might be something for you. If not, you may not have a new enough card for that.
If the answer to “hosted network supported” is yes, let’s move on!
Once you know that your computer supports sharing wi-fi in this way, there are a couple of options. You can input a series of commands in this command prompt to set up a network, which is the most difficult option. Alternatively, you can download third-party software to do this for you very easily, but this may cost money. If you have Windows 7, there is an option that falls between these two in terms of difficulty, but we won’t cover that here. We will start with some software suggestions before moving on to a run-through of the expense-free, but more complicated command prompt option.
Connectify
I don’t normally endorse paid software right off the bat, but if you don’t want to stress, this is what you should get. Once upon a time, Connectify was free. Now, you can test it for free but it won’t be all that useful until you purchase a license. They have 1-year and lifetime licenses that cost $25 and $40, respectively. Connectify Hotspot is what you want – not Dispatch. Dispatch has its own uses, but not for wi-fi sharing, and we won’t get into Dispatch’s functions here.
Connectify often has sales and students can always get 50% off with a valid .edu email address. If you have paid for the product, the team at Connectify will go above and beyond to offer you customer support, including offering refunds when people are not happy or find out their computer is incompatible. The software is fairly user-friendly and feature-packed.
Download/buy: here
WiFi Hotspot Creator
This program is a little less well-known and slightly less user-friendly than Connectify, but it is totally free. If you aren’t sure whether you want to ever use paid software like Connectify, you should certainly give this a shot before you start trying to set up your network through the command prompt. If it does not work for you, which does seem to happen more than it should, feel free to reach out to their developers. If you don’t want to do that, still try out the Connectify Lite to see if any program can get things running on your PC.
Download: here
Through command prompt
If you’re cheap, like to tweak, or just weren’t having any luck with the software options, you can try to set this baby up via the command prompt. Starting off where you were, type in the following:
netsh wlan set hostednetwork mode=allow ssid=networkname key=networkpassword
Except, of course, you will want to write the name for your hotspot where you see “networkname” and your desired password where you see “networkpassword.” Press enter.
When you’re ready to start up your network, it’s time for another command. This time, input the following:
netsh wlan start hostednetwork
If you see “the hosted network started,” then you’ve been successful! If the command prompt responds with “the hosted network could not be started,” then refer to the troubleshooting section below. If you did not have any problems up to this point, you still have one more step.
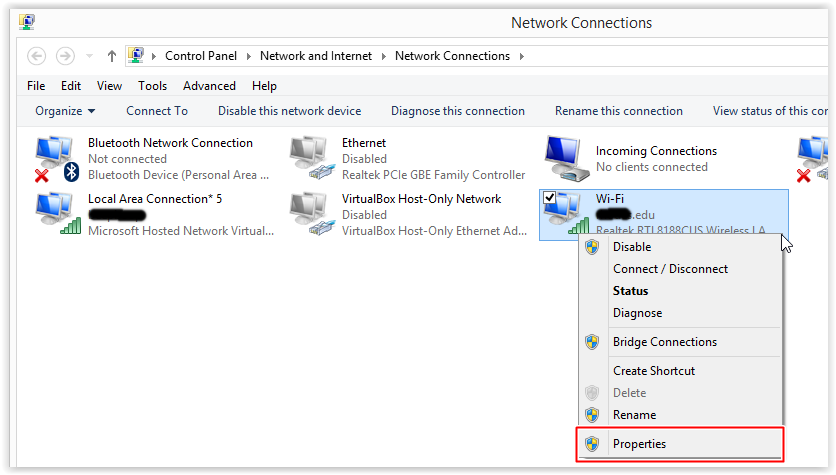
Go to your Control Panel, then click Network and Internet. Once there, click Network and Sharing Center. On the left side of that window, click “Change adapter settings.” You will see a set of connections something similar to below. Your current wi-fi connection will usually just say “Wi-Fi” and then whatever the name of the connection you are currently connected to is. The newly created connection will usually be “Local Area Connection* #” with the number varying. If it says that it is connected to the internet, go ahead and try to connect your device to this network using the name and password you set up through the command prompt.
It will probably say that it isn’t connected to the internet at this point, though, so do not worry. To fix this, right-click on your current Wi-Fi connection and then click on properties (you will need administrator privileges for this, too).
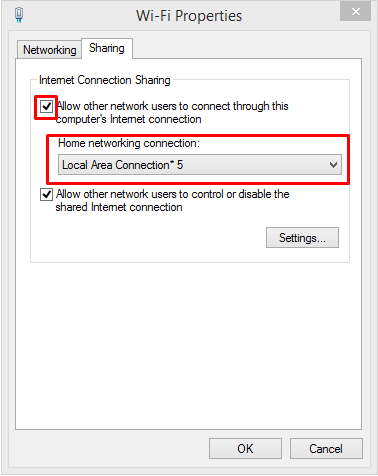
Once there, you want to check the box that says “allow other network users to connect through this computer’s internet connection.” Then, go to the dropdown menu and select the hot-spot you created, which will be labeled “Local Area Connection* 5.”
At this point, you should be totally ready to go. If things aren’t working, move on to the troubleshooting section.
Troubleshooting
The vast majority of problems getting connected are caused by out of date drivers. Drivers are the special programs that are hidden inside your system that tell your computer how to communicate with its various parts. You have drivers for your mouse, keyboard, monitor, every USB connection, and (among many other things) your wireless networking card. This is the driver we are most interested in.
Unfortunately, every manufacturer handles driver updates differently. Here are a few suggestions to try to get your drivers up to date.
Update Windows. Make sure your version of Windows is up to date. This can usually be accessed through the Control Panel.
Check your computer manufacturer’s website. Some computer makers have specific sections of their support site dedicated to posting up-to-date drivers. You will need to know your computer’s model number to find the right ones, in all likelihood.
If you haven’t had any luck with the previous steps, look into your wireless networking card’s manufacturer. You can find out the maker and model number from the same set of information that told you whether your card supported sharing your connection. See below:
The “driver” section will typically tell you the model number, which in this case is RTL8188CUS. The manufacturer of this wireless card is Realtek. Try to find Realtek’s (or whoever made your card’s) website, as they often keep updates there.
Once you find a driver update, you will download it and open it — from there, it should install like any other program. You may need to restart your computer when it finishes.
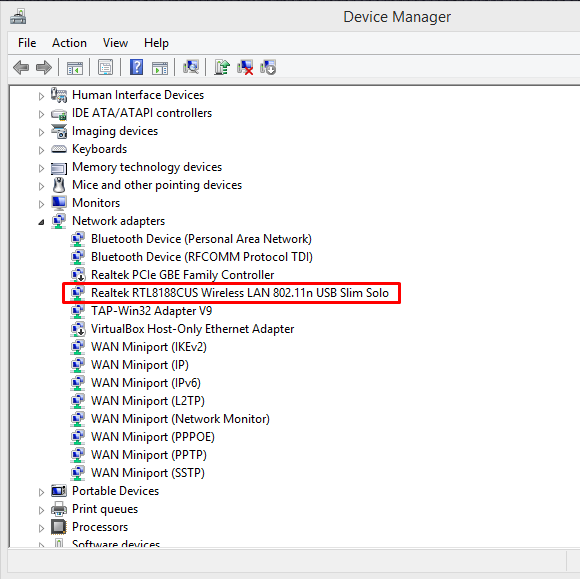
- Open _Device Manager _either through your control panel or by searching from the start/search menu. Scroll to the section labeled Network adapters and find your wireless card. It should go by the same name as its model number, so in this example it will be RTL8188CUS.
From there, right-click and then select “Update driver software…” Ask it to search the internet for updates. This method does not work nearly as well as you might think, but it’s worth a try and it will at least take care of a driver that is completely missing.
If none of these worked for you, it is likely that either there is no driver update for your card, the card cannot actually support this kind of wireless connection, or perhaps something in the next troubleshooting section is at fault.
The other common people run into happens when entering the “start hostednetwork” command in the command prompt. If you are told “the hostednetwork could not be started” or a similar message, try this out.
Go to the _Device Manager _via the Control Panel or by searching from your start/search menu. See the image above for a look at what _Device Manager _looks like. Instead of the network adapter that has the same name as your wireless card, look for one called “Microsoft Hosted Network Virtual Adapter” (there may be a number afterwards too). Right click and press “enable.” Go back to the command prompt and re-enter the “start hostednetwork” command outlined earlier in this article.
How did it go?
Please share your thoughts and questions in the comments. Please keep in mind that the computer hosting this network must be:
Connected to the internet, meaning you may have to open a browser to accept terms and conditions and/or sign in before your hosted network will have internet access.
On a related note, the computer must stay on and awake. You’ll have to make sure laptops are plugged in and desktops aren’t set to sleep after just a few minutes for as long as you want to host your own hotspot.
Featured image courtesy of Flickr user boklm
COMMENTS
Search
Related Posts
Recent Posts
- Make Prism.js show line numbers by default (without CSS classes)
- Hemingway App 3.0 update review: A gimmick becomes a real app
- Hugo vs. WordPress page load speed comparison: Hugo leaves WordPress in its dust
- Hemingway App 2.0 update: A worthwhile update comes with unfortunate price hike
- How to view academic journal articles off campus using your library's proxy
categories
Support This Site
Bitcoin Donations:18DP9TGdPN5usTKMRMfPk6Q2mSr4mAz8NJLitecoin Donations:
LPKQbDPykwjXr5NbXfVVQH9TqM5C497A16